How to create cropped and scaled thumbnails in PHP
En Español
In the previous post, we created scaled thumbnails of images that maintained their aspect ratio. In this post we will see how to crop and scale the image to fill the thumbnail area.
Topics
Objective, requirements and usage
Creating the function
Footnotes
Download the function
Objective, requirements and usage
Our objective here, is that given the thumbnail size, we scale down the source image so that it fits in the given area without leaving blank space, and everything that doesn't fit in the rectangular area of the thumbnail is cut off.
Usually, when we dynamically upload an image to the server, we save the name of said image in a database, or we assign it a name that we can relate to an entry; the following example assumes that we obtain the information from an entry in a variable called $row["image"] and that we use this to call the image:
<img src="/path/<?=$row["image"];?>" width="100" height="100" alt="" />The idea is that instead of call the image as in the previous example, we can call it as in the following one, assuming "mini" is the prefix that we wish to use; we can also use something like "mini100x100" if we want, this may be useful if we generate more than one size, giving each size it's own prefix:
<img src="/path/mini_<?=$row["image"];?>" alt="" />We require only four values for this:
- The path of the image: This image needs to be already stored in a folder inside our server, therefore, this function is to be called after we process the image upload request.
- The desired width of the preview.
- The desired height of the preview.
- A prefix (or you may use a suffix if you wish) to be added to the name of the original image.
And it will be called as follows, once the image is in the server, adjusting the relative path to the image, the size and the prefix that we desire:
create_cropped_thumbnail("../images/".$image_name, 100, 100, "mini");Creating the function
We need to create an image buffer with the original image, then we calculate whether we need to cut the image and how much, then we create a secondary image buffer where we are going to store the scaled down image, we perform the scale and crop operation, after this we save the new image, and finally we destroy the image buffers.
function create_cropped_thumbnail($image_path, $thumb_width, $thumb_height, $prefix) {First of all we check that the parameters are positive integer numbers.
if (!(is_integer($thumb_width) && $thumb_width > 0)) {
    echo "The width is invalid";
    exit(1);
}

if (!(is_integer($thumb_height) && $thumb_height > 0)) {
    echo "The height is invalid";
    exit(1);
}
Then we find out what type of image we are dealing with, a gif, a jpg or a png file, by using pathinfo(), and we create the first image buffer.
$extension = pathinfo($image_path, PATHINFO_EXTENSION);
switch ($extension) {
    case "jpg":
    case "jpeg":
        $source_image = imagecreatefromjpeg($image_path);
        break;
    case "gif":
        $source_image = imagecreatefromgif($image_path);
        break;
    case "png":
        $source_image = imagecreatefrompng($image_path);
        break;
    default:
        exit(1);
        echo "Invalid file type";
        break;
}
After loading the image buffer, we obtain it's width and it's height:
$source_width = imageSX($source_image);
$source_height = imageSY($source_image);
Now we need to calculate the missing parameters to be able to generate the thumbnail, cross-multiplications are used here to calculate either the width or the height of the area that we are going to use to generate the thumbnail, and then we use a difference to find the starting coordinates from which we are going to slice the source image to create the thumbnail. We may have three different situations here:
The source image and the thumbnail have the same aspect ratio.

In this case we simply assume the coordinates start at 0, 0 and don't perform any calculation, upon scaling the image it will fit perfectly in the thumbnail.
if ((($source_width / $source_height) - ($thumb_width / thumb_height)) == 0) {
    $source_x = 0;
    $source_y = 0;
}
The source image is wider than the thumbnail.
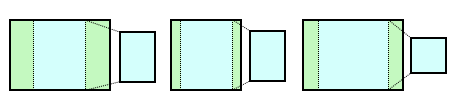
In this case we keep the height of the source image, and we recalculate the width with a cross-multiplication, based on the aspect ratio of the thumbnail. We also take the y coordinate as 0, and calculate the x coordinate. If we want the thumbnail to start from the left we can set the x coordinate to 0 as well, or if we want it to start from the right, we can adjust the formula as $source_x = $source_width - $temp_width;
if (($source_width / $source_height) > ($thumb_width / $thumb_height)) {
    $source_y = 0;
    $temp_width = ceil($source_height * $thumb_width / $thumb_height);
    $source_x = ceil(($source_width - $temp_width) / 2);
    $source_width = $temp_width;
}
The source image is narrower than the thumbnail.
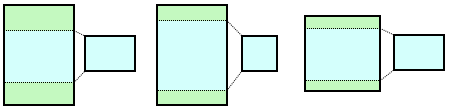
In this case we keep the width of the source image, and recalculate the height with a cross-multiplication, based on the aspect ratio of the thumbnail. We take the x coordinate as 0, and calculate the y coordinate. If we want the thumbnail to start from the top, we can set the y coordinate to 0, or if we want it to start from the bottom, we can adjust the formula to $source_y = $source_height - $temp_height;
if (($source_width / $source_height) < ($thumb_width / $thumb_height)) {
    $source_x = 0;
    $temp_height = ceil($source_width * $thumb_height / $thumb_width);
    $source_y = ceil(($source_height - $temp_height) / 2);
    $source_height = $temp_height;
}
Once we calculate the necessary values, we create the thumbnail buffer with ImageCreateTrueColor():
$target_image = ImageCreateTrueColor($thumb_width, $thumb_height);And we create the thumbnail with all the information that we just obtained, for this we use imagecopyresampled():
imagecopyresampled($target_image, $source_image, 0, 0, $source_x, $source_y, $thumb_width, $thumb_height, $source_width, $source_height);Once we do this, we save the image, we use the extension that we extracted previously to generate the new image:
$target_file = pathinfo($image_path, PATHINFO_DIRNAME) . "/";
$target_file .= $prefix . "_" .  pathinfo($image_path, PATHINFO_FILENAME);
switch ($extension) {
    case "jpg":
    case "jpeg":
        imagejpeg($target_image, $prefix . "_" . $image_path);
        break;
    case "gif":
        imagegif($target_image, $prefix . "_" . $image_path);
        break;
    case "png":
        imagepng($target_image, $prefix . "_" . $image_path);
        break;
}
And finally, we destroy the image buffers with imagedestroy() and close the function:
    imagedestroy($target_image);
    imagedestroy($source_image);
}
Footnotes
If we want to use a suffix instead of a prefix we just need to replace $prefix with $suffix in the function declaration, and we change the line:
$target_file .= $prefix . "_" . pathinfo($image_path, PATHINFO_FILENAME);for the lines:
$target_file .= pathinfo($image_path, PATHINFO_BASENAME);
$target_file .= "_" . $suffix . "." . $extension;
Download the function
Just remember to call it once the image was uploaded to the server, and add the prefix (or suffix) to the name of the image to show the thumbnail.
thumb_cropped.tar.gz
md5sum: 3be7a30d9b088b00b661e0fd62f42160